VPN
Article by on January 5, 2014
How to Setup OpenVPN
A. Setup the VPN Server
In this tutorial, we will assume you are using Ubuntu 12.04 or equivalent for your VPN server.
1. Install OpenVPN
First, install OpenVPN:
$ sudo apt-get install openvpn
2. Create Server Certificates
a. Setup Easy RSA
In this example we will use easy-rsa. So, copy the easy-rsa files to /etc/openvpn for easier access:
$ cd /etc/openvpn
$ mkdir easy-rsa
$ cp -r /usr/share/doc/openvpn/examples/easy-rsa/2.0/* ./easy-rsa/
$ cd easy-rsa
b. Configure Easy RSA
Next, configure Easy RSA. For simplicity, I'll show the lines that I changed with ellipses to show lines skipped:
$ vim vars
export KEY_SIZE=2048
...
export KEY_COUNTRY="US"
export KEY_PROVINCE="OH"
export KEY_CITY="Cincinnati"
export KEY_ORG="Joseph D. Purcell"
export KEY_NAME="Joseph D. Purcell"
export KEY_EMAIL="myemail@mail.com"
export KEY_CN="vpn.example.com"
export KEY_OU="vpn.example.com"
Now, we need to load those variables into your current session:
$ source vars
Next, if this is your first time, you will need to run clean-all which will delete the keys directory (including the index of pre-existing keys, if they exist) and create a new directory and index. In other words, don't run this if you have keys in there you still want.
$ ./clean-all
c. Create Your Certificate Authority
Next, we will create a signing key which will be used to self-sign certificates:
$ ./build-ca

Generating a 2048 bit RSA private key
.................................................................................................................+++
.+++
writing new private key to 'ca.key'
-----
You are about to be asked to enter information that will be incorporated
into your certificate request.
What you are about to enter is what is called a Distinguished Name or a DN.
There are quite a few fields but you can leave some blank
For some fields there will be a default value,
If you enter '.', the field will be left blank.
-----
Country Name (2 letter code) [US]:
State or Province Name (full name) [OH]:
Locality Name (eg, city) [Cincinnati]:
Organization Name (eg, company) [Joseph D. Purcell]:
Organizational Unit Name (eg, section) [vpn.example.com]:
Common Name (eg, your name or your server's hostname) [vpn.example.com]:
Name [Joseph D. Purcell]:
Email Address [myemail@mail.com]:
Notice that Easy RSA should have pre-populated the fields for you.
d. Create Your VPN Server Certificate and Key
Next, we need to create a public certificate and private key for the VPN server. The certificate is public and is used to identify the server, but the key should be kept private.
$ ./build-key-server vpn.example.com

Generating a 2048 bit RSA private key
.........................+++
....................................................................................................+++
writing new private key to 'vpn.example.key'
-----
You are about to be asked to enter information that will be incorporated
into your certificate request.
What you are about to enter is what is called a Distinguished Name or a DN.
There are quite a few fields but you can leave some blank
For some fields there will be a default value,
If you enter '.', the field will be left blank.
-----
Country Name (2 letter code) [US]:
State or Province Name (full name) [OH]:
Locality Name (eg, city) [Cincinnati]:
Organization Name (eg, company) [Joseph D. Purcell]:
Organizational Unit Name (eg, section) [vpn.example.com]:
Common Name (eg, your name or your server's hostname) [vpn.example.com]:
Name [Joseph D. Purcell]:
Email Address [josephdpurcell@gmail.com]:

Please enter the following 'extra' attributes
to be sent with your certificate request
A challenge password []:
An optional company name []:
Using configuration from /etc/openvpn/easy-rsa/openssl.cnf
Check that the request matches the signature
Signature ok
The Subject's Distinguished Name is as follows
countryName           :PRINTABLE:'US'
stateOrProvinceName   :PRINTABLE:'OH'
localityName          :PRINTABLE:'Cincinnati'
organizationName      :PRINTABLE:'Joseph D. Purcell'
organizationalUnitName:PRINTABLE:'vpn.example.com'
commonName            :PRINTABLE:'vpn.example.com'
name                  :PRINTABLE:'Joseph D. Purcell'
emailAddress          :IA5STRING:'myemail@mail.com'
Certificate is to be certified until Jan  3 01:12:03 2024 GMT (3650 days)
Sign the certificate? [y/n]:y

1 out of 1 certificate requests certified, commit? [y/n]y
Write out database with 1 new entries
Data Base Updated
e. Create a Diffie-Hellman Key
The Diffie-Hellman key is used to establish a shared secrete between the server and the client on initial contact to encrypt key exchanges.
$ ./build-dh
Generating DH parameters, 2048 bit long safe prime, generator 2
This is going to take a long time
.............+.........................................
(many many lines of this...)
.......................................+.........++*++*
f. Copy the Keys
cp ./keys/vpn.joep-bup.key ../
cp ./keys/vpn.joep-bup.crt ../
cp ./keys/ca.crt ../
cp ./keys/dh2048.pem ../
3. Create Client Certificates
While we are at it, let's go ahead and create our certificates for the clients that will be connecting. In this example, we will just say there is only one computer called "joep-laptop".
$ ./build-key joep-laptop
Generating a 2048 bit RSA private key
.....................................................+++
...+++
writing new private key to 'joep-laptop.key'
-----
You are about to be asked to enter information that will be incorporated
into your certificate request.
What you are about to enter is what is called a Distinguished Name or a DN.
There are quite a few fields but you can leave some blank
For some fields there will be a default value,
If you enter '.', the field will be left blank.
-----
Country Name (2 letter code) [US]:
State or Province Name (full name) [OH]:
Locality Name (eg, city) [Cincinnati]:
Organization Name (eg, company) [Joseph D. Purcell]:
Organizational Unit Name (eg, section) [vpn.example.com]:joep-laptop
Common Name (eg, your name or your server's hostname) [vpn.example.com]:joep-laptop
Name [Joseph D. Purcell]:
Email Address [myemail@mail.com]:

Please enter the following 'extra' attributes
to be sent with your certificate request
A challenge password []:
An optional company name []:
Using configuration from /etc/openvpn/easy-rsa/openssl.cnf
Check that the request matches the signature
Signature ok
The Subject's Distinguished Name is as follows
countryName           :PRINTABLE:'US'
stateOrProvinceName   :PRINTABLE:'OH'
localityName          :PRINTABLE:'Cincinnati'
organizationName      :PRINTABLE:'Joseph D. Purcell'
organizationalUnitName:PRINTABLE:'joep-laptop'
commonName            :PRINTABLE:'joep-laptop'
name                  :PRINTABLE:'Joseph D. Purcell'
emailAddress          :IA5STRING:'myemail@mail.com'
Certificate is to be certified until Jan  3 01:26:02 2024 GMT (3650 days)
Sign the certificate? [y/n]:y

1 out of 1 certificate requests certified, commit? [y/n]y
Write out database with 1 new entries
Data Base Updated
Next, create a key for the "HMAC firewall" which helps block DoS attacks and UDP port flooding. This is optional, but it's easy enough to do:
$ openvpn --genkey --secret ta.key
Finally, we will copy the keys to my home directory and give me read permissions so I can copy them to my laptop later:
$ cp ca.crt /home/joep/
$ cp ta.key /home/joep/
$ cp ./keys/joep-laptop.crt /home/joep/
$ cp ./keys/joep-laptop.key /home/joep/
$ chown joep /home/joep/ca.crt
$ chown joep /home/joep/ta.key
$ chown joep /home/joep/joep-laptop.crt
$ chown joep /home/joep/joep-laptop.key
4. Configure OpenVPN
At last, let's configure OpenVPN. Copy the default config:
$ cp /usr/share/doc/openvpn/examples/sample-config-files/server.conf.gz /etc/openvpn
$ gzip -d server.conf.gz
Now, edit it; in this case I will show important lines:
$ vim server.conf
port 1194
proto udp
dev tun
ca ca.crt
cert vpn.example.com.crt
key vpn.example.com.key  # This file should be kept secret
dh dh2048.pem
server 10.8.0.0 255.255.255.0
push "redirect-gateway def1 bypass-dhcp"
tls-auth ta.key 0 # This file is secret
And, restart openvpn:
$ sudo service openvpn restart
5. Configure Networking
Here comes the tricky part. Again, assuming you want to be able to access the WAN when you connect to your VPN server you will need to configure NAT and ensure port 1194 is open.
a. Ensure Port 1194 is Open
I haven't figured out a reliable way to scan a VPN port to see if it's available. So, one way to do this is to use netcat. On a client computer open up two terminals. In the first, ssh into your VPN server and run:
$ nc -u -l 1194
Then, in the second terminal, run:
$ nc -u 192.168.0.9 1194
Now, if you put the two windows side-by-side and type something in the second terminal, you should see the same text on the server. If you do, then your port is open. If not, you need to open it.
Using ufw, you would do something like the following on your VPN server:
$ ufw allow 1194
Or, with iptables, something like:
$ iptables -I INPUT --dport 1194 -j ACCEPT
Then, use our netcat test to ensure the port is open.
b. Ensure NAT is Enabled
This is where I get lost, but I know the following worked for me. I'm using ufw so you will have to figure this out on your own if using iptables. First, edit the ufw sysctl.conf and uncomment the following line:
$ vim /etc/ufw/sysctl.conf
net/ipv4/ip_forward=1
Next, set the default forwarding policy to accept:
$ vim /etc/default/ufw
DEFAULT_FORWARD_POLICY="ACCEPT"
Finally, configure the NAT settings for the 10.8.0.0/24 subnet by adding the following lines to the end of the ufw before.rules:
$ vim /etc/ufw/before.rules
# Configure NAT settings
*nat
:POSTROUTING ACCEPT [0:0]
-A POSTROUTING -s 10.8.0.0/24 -o eth0 -j MASQUERADE
COMMIT
Now, restart ufw:
$ sudo ufw stop
$ sudo ufw start
$ iptables -t nat -A POSTROUTING -s 10.8.0.0/24 -o eth0 -j MASQUERADE
See Eric Hansen's article on linux.org for more details.
B. Setup the VPN Client
Finally, we can configure the VPN client (i.e. the computer connecting to the VPN server). First, we need to copy down the certificates and key from the server:
$ mkdir vpn
$ cd vpn
$ scp joep@vpn.example.com:ca.crt ./
$ scp joep@vpn.example.com:ta.key ./
$ scp joep@vpn.example.com:joep-laptop.crt ./
$ scp joep@vpn.example.com:joep-laptop.key ./
Then, be sure to go on the server and delete the copies made:
$ rm /home/joep/ca.crt
$ rm /home/joep/ta.key
$ rm /home/joep/joep-laptop.crt
$ rm /home/joep/joep-laptop.key
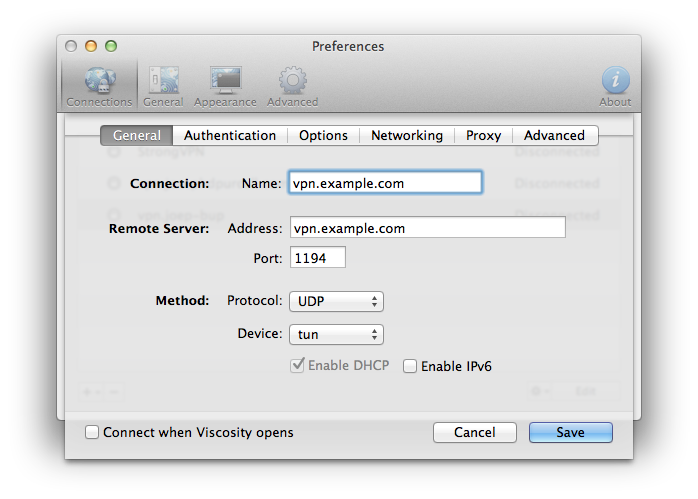
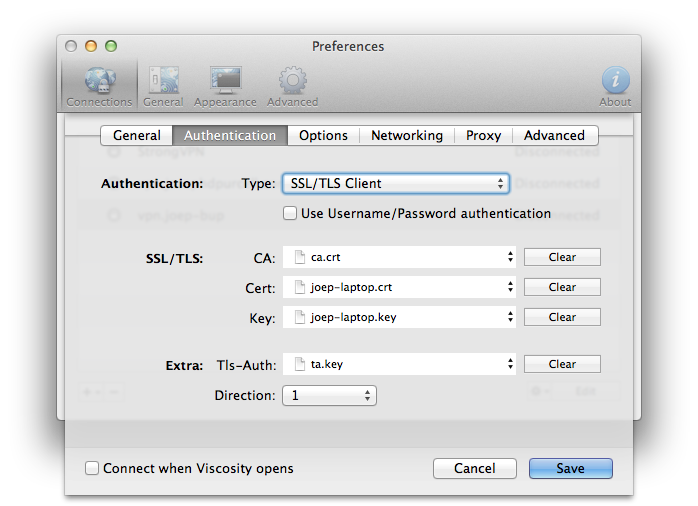
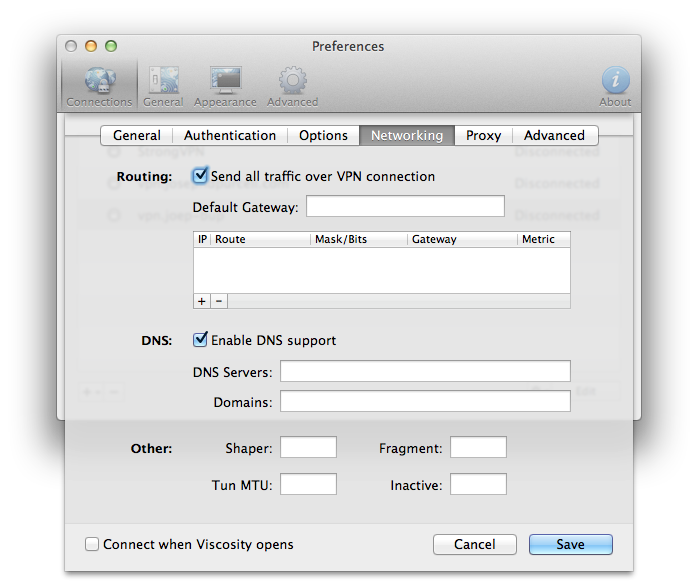
Okay, now I recommend using an application like Viscosity because it's easy to use. Here is an example of how to configure Viscosity:
C. Notes
If you want to connect to the VPN server but do not care to access the WAN, you can skip the entire step of enabling NAT. You also do not need push "redirect-gateway def1 bypass-dhcp" in your VPN server.cnf.
D. Further Reading
- http://askubuntu.com/questions/35647/how-do-i-setup-openvpn-so-i-can-securely-use-the-internet-from-an-unsecured-hots
- https://www.grc.com/VPN/vpn.htm
- http://openmaniak.com/openvpn_tutorial.php
- http://serverfault.com/questions/9708/what-is-a-pem-file-and-how-does-it-differ-from-other-openssl-generated-key-file
- http://www.serverubuntu.it/openvpn-bridge-configuration
- http://www.hackingmachines.com/wiki/OpenVPN_Ethernet_Bridge
- https://help.ubuntu.com/community/OpenVPN
- http://www.linux.com/learn/tutorials/457103-install-and-configure-openvpn-server-on-linux
- http://www.thegeekstuff.com/2013/09/openvpn-setup/
- https://help.ubuntu.com/12.04/serverguide/openvpn.html
- https://www.tinfoilsecurity.com/blog/dont-get-pwned-on-public-wifi-use-your-own-vpn-tutorial-guide-how-to
- http://www.linux.org/threads/linux-containers-part-5-creating-your-own-vpn.4431/